Launch Center Pro and Day One
I’ve recently discovered Launch Center Pro for iOS that lets you create actions and generally extends the abilities of iOS a bit (basically allowing you to create shortcuts to tasks you do often).
There’s a number of things I do on the iPhone or iPad consistently, so being able to do these from a single app can make it shorter to do. It’s a one stop shop for accessing stuff. For example, I’ve set up a shortcut so I can message both my mum and dad at the same time, without having to open Messages, select new message (or find a previous message I’ve sent to them both) and add them both to the message and then compose. This one lets me just open Launch Center (it’s on my dock), select contacts and then the message parents option. Easier.
Other tasks I do on the iPad regularly, one of which is logging using Day One. I’ll often do this in bed on the iPad after I’ve put my kindle down or stepped away from the Mac.
However, whilst I’ve managed to journal everyday for the past year, I’m always looking to improve.
Activity Logging
One of the things I would like to add is activity logging. So I cycle fairly regularly and upload most of my rides (not my standard weekday commute though) to Strava and Garmin for tracking (as I do like statistics, even if they’re just to create graphs).
However, there wasn’t really an easy way to add these to Day One without just adding them to the text. I’d like to include them in an easy to read format and perhaps in instances separate to my main journal entries.
Then I stumbled across this post when investigating Launch Center. It has a number of ready made logging shortcuts for Day One that are launched from Launch Center itself and populates it with a table. This was what I’d been looking for!
After some playing, the basic table I came up with was the following:
| Type | |
| Distance (Km) | |
| Time (minutes) | |
| Calories Burnt (KCal) | |
| URL |
This would give me a basic table. However, the benefit of Launch Center was that I could also repopulate the table when inserting it into Day One, using prompts for the user. I was therefore then able to add prompts to allow the user to fill it in as they inserted it. This allows the user to select from either Cycling, Running, Walking, Swimming or Other (this covers my own activities) and then lets you specify the other item - the URL field is for linking to online tracks of the data (on Strava or Garmin).
This gives the following code to insert into Launch Center.
<code>dayone://post?entry=%0D%0A%7C%20Daily%20Activity%20%7C%20%7C%0D%0A%7C%20---%20%7C%20---%20%7C%20---%20%7C%0D%0A%7C%20Type%20%7C%20[list:Activity Type|Cycling|Running|Walking|Swimming|Other]%20%7C%0D%0A%7C%20Distance%20%7C%20[prompt-num:How long was it?]Km%20%7C%0D%0A%7C%20Time%20%7C%20[prompt-num:How long did you do it for?]%20minutes%20%7C%0D%0A%7C%20Calories%20Burnt%20%7C%20[prompt-num:Amount of calories burnt?]Kcal%20%7C%0D%0A%7C%20URL%20%7C%20[ [list:URL Location|Strava|Garmin|] ]([prompt:URL Location])%20%7C
</code>
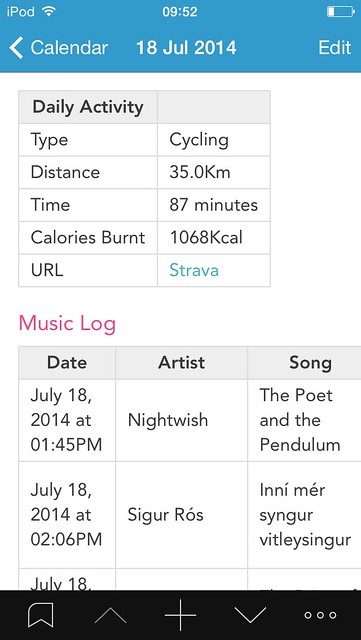
You can also grab the URL from Launch Center’s site here. This allows a laid out entry to inserted into Day One, such as this.
(Ignore the music log, that’s to be sorted slightly and discussed in another post).
The Strava or Garmin URL is easily taken from the Strava/Garmin app and inserted and as the URL doesn’t mess with the clipboard, I can open Strava, copy the URL, open Launch Center, select the action and walk through it and paste the URL in.
Keyboard Maestro
However, I don’t just log on my iPad, I also log on my iMac as well, depending on my mood or where I am.
How could I do the same on the Mac? Well, I’ve been a keen user of Keyboard Maestro since I discovered it was a lot more powerful than Textexpander (but still allowed me to use it for basic text expansion like Textexpander). Now it’s a program I miss when not at a Mac (the big one for me is highlighting a word and then pressing specific hotkey to replace it with a Markdown link!)
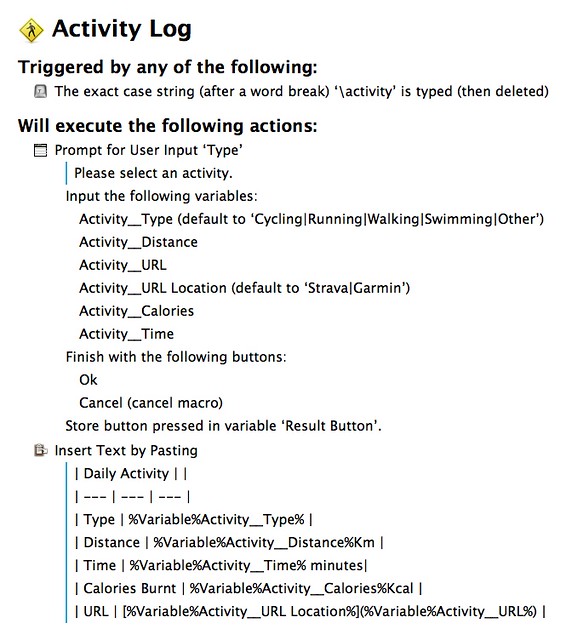
Anyhow, after some playing about, I was able to get the Launch Center Pro URL translated fairly well into Keyboard Maestro.
Here’s how (I have this set to only run in Day One).
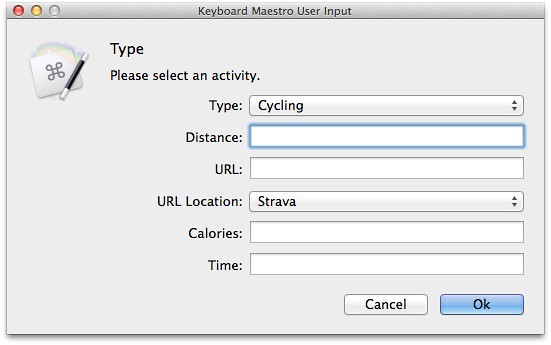
Typing activity in Day One will then bring me up the following input dialogue box that lets me repopulate the table for pasting.
This then outputs exactly the same table so I’m able to log regardless of what platform I’m on!
If you want to download this macro, I have it on Dropbox.
Conclusion
With this basic table template completed, I’m looking at expanding this to a few more items - I’m playing with recording all my Last.fm scribbles into a text file using IFTTT to help me log them. I’ve already got the basic working, with the scribbles being download to my Dropbox in a Markdown formatted table.
Hopefully, I’ll be able to add some more in the near future - I’m using the Book Logging one from the previously mentioned blog post. The next time I run this, I’ll convert it to a Keyboard Maestro macro as well.


